
Tidak ada produk di keranjang.
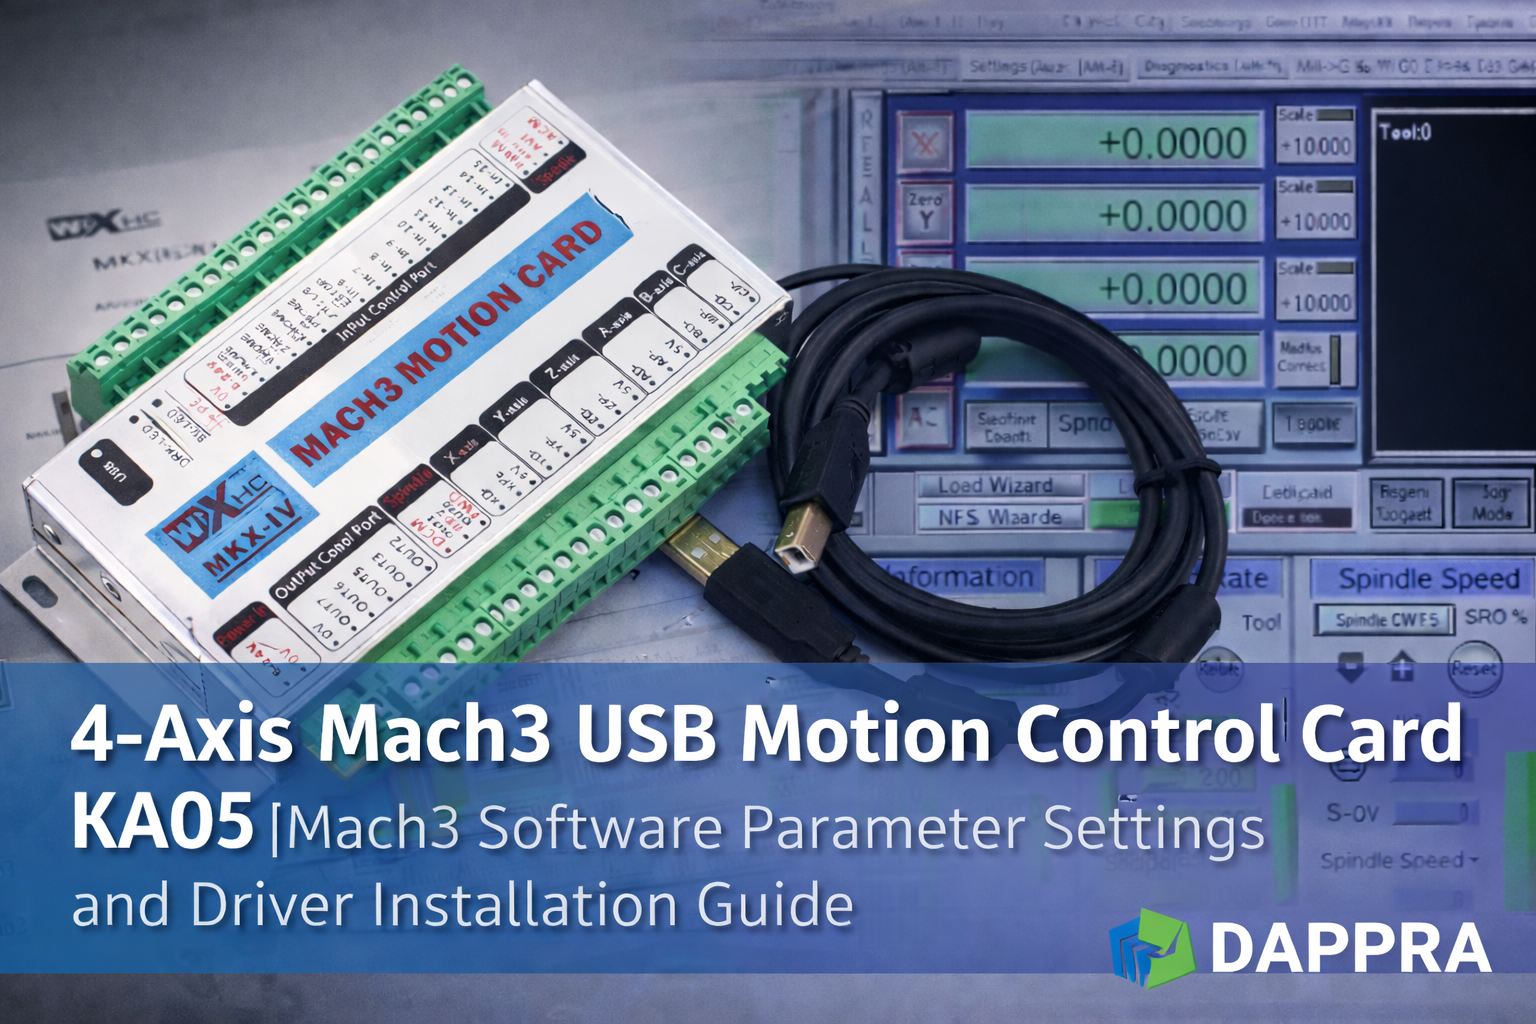
DAPPRA MKX 4-Axis Mach3 USB Motion Control Card KA05 Software Setup Parameters dan Driver Installation
Installation Instruction
Mach3 software ready
This card is a Mach3 USB interface 4/6-axis motion control card.
The Mach3 software:
4 Axis Mach3 USB Motion Control Card KA05 – MACH3 Software
DAPPRA MKX Operating and Installation Instruction
Abstract
The MKX driver can be used under Windows XP, Windows 2000 and Windows 7 operating system.
This document includes:
- MKX driver Installation Steps
- MKX first run steps
- Shooting troubles
一、MKX Driver Installation
1. Download Mach3 Software
Please download the latest Mach3 driver from Mach3 official website:
http://www.machsupport.com/downloads.php
2. Install Mach3
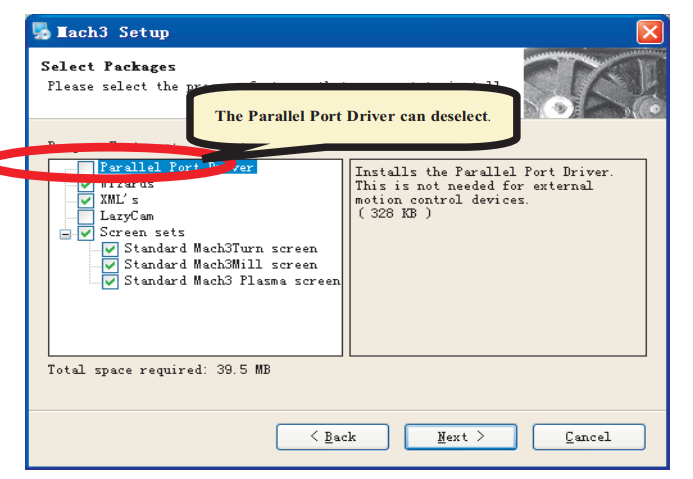
The Parallel Port Driver does not require.
The Parallel Port Driver can deselect.
3. Prepare USB Connection
- Prepare the USB cable
- Connect the USB cable to MKS USB socket
- Insert the other end to the PC USB port
4. Driver Installation
- Windows will automatically install the driver
- Wait for the driver installation to finish
5. Install MKS Card Plug-in
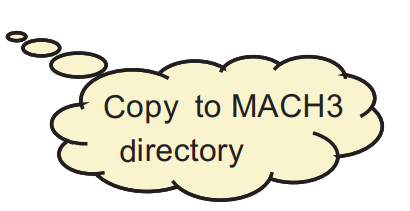
- Copy NCusbPod.dll to:
Mach3\PlugIns\ - Copy mach3mill.xml configure file to:
Mach3\
If you don’t copy the mach3mill.xml file, you should do the next step manually.
6. Start Mach3 and Select Plug-in
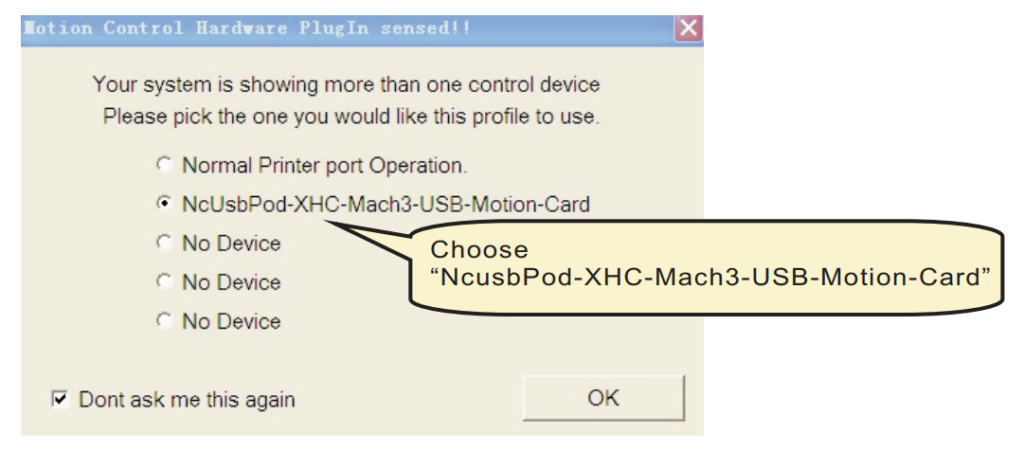
Open Mach3 software, choose:
NcusbPod-XHC-Mach3-USB-Motion-Card
Choose:
“Don’t ask me this again”
7. Interface Adjustment
If there is a black window in Mach3:
- Click
View → Load Screen - Choose
1024.set
Press Reset button and make it normal (don’t flash).
Now everything should be OK.
If any problem, please refer to shooting troubles.
二、MKX First Run Steps
When you first run MKS, you should configure:
- Motor parameter
- Home neg
- Motor move way
- Output and input IO
2.1 X, Y, Z, A, B, C Axis Output Configuration
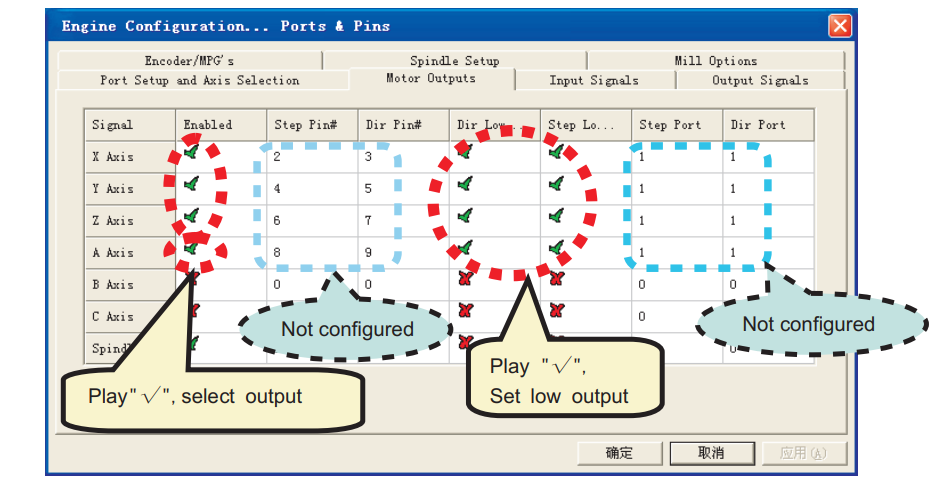
Path:Config → Ports and Pins
- Enable axis (√)
- Set low output
- Select output
If motor moving way is reverse, please make Dir Low Reverse
Change from √ to ×, or change from × to √.
2.2 Motor Parameter Settings
Path:Config → Motor Tuning
Set:
- Acceleration
- Velocity
- Steps per
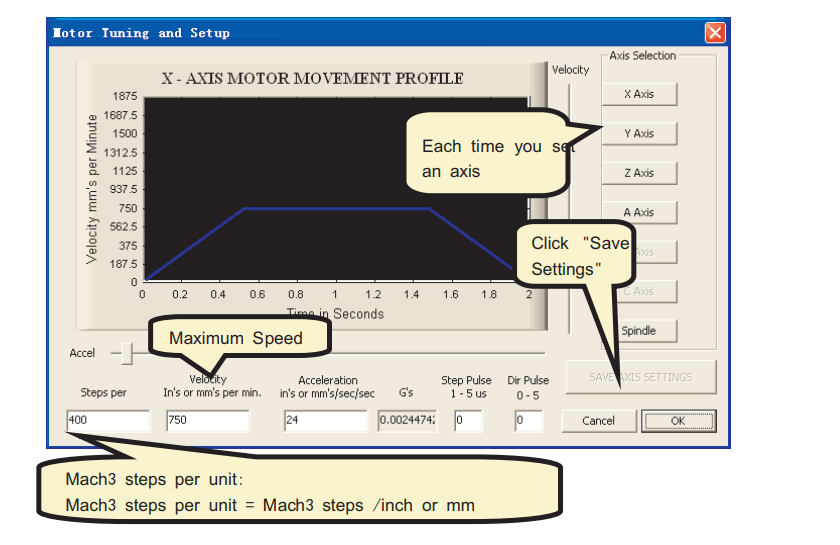
Each time you set an axis, click Save Settings.
Mach3 steps per unit:
Mach3 steps per unit = Mach3 steps / inch or mm
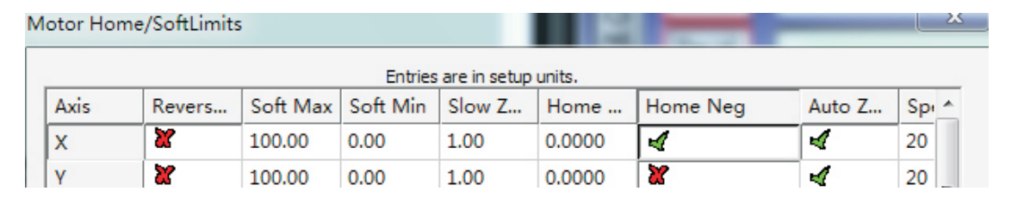
2.3 Homing / Limits Settings
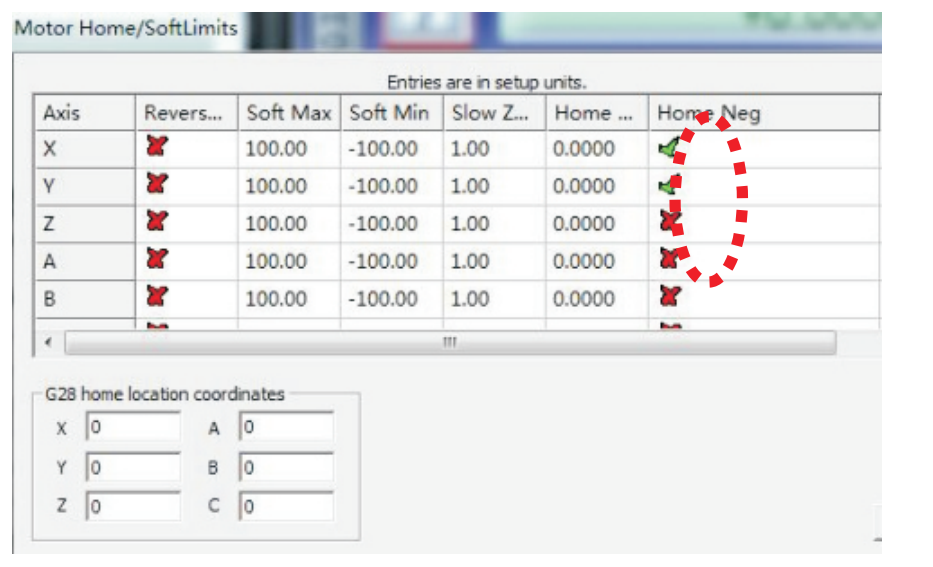
Path:Config → Homing / Limits
Home direction depends on Home Neg.
If home moving way is reverse, please make Home Neg Reverse
Change from √ to ×, or change from × to √.
2.4 Input Signal Setup
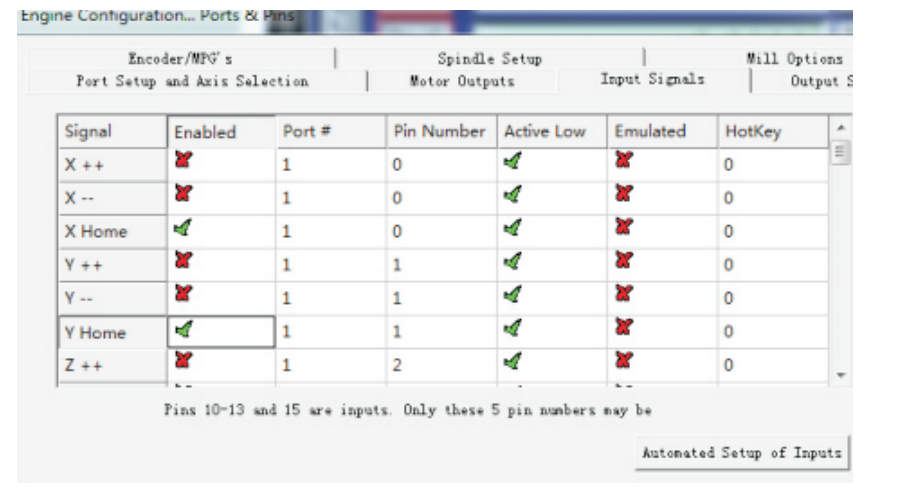
Path:Config → Ports and Pins → Input Signals
- Pin number starts from 0
- Suggest Active Low = √
(Set low signal level for inputs)
2.5 Output Signal Setup
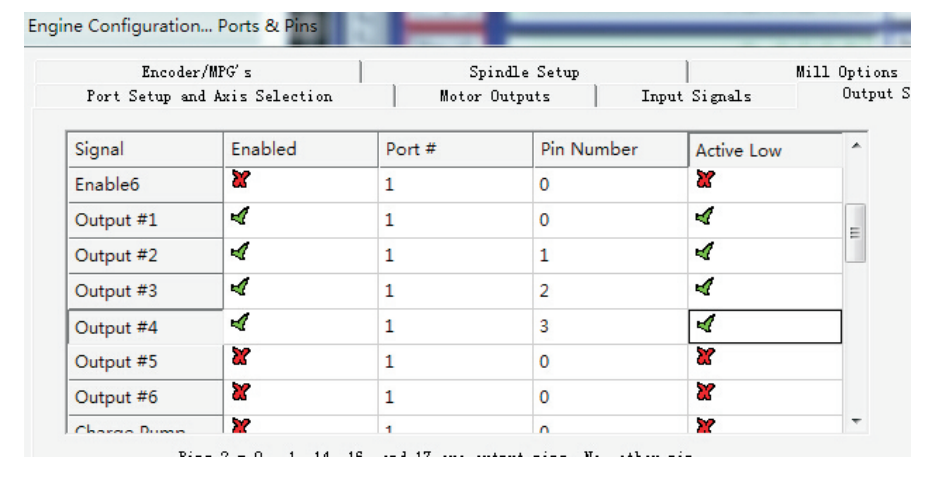
Path:Config → Ports and Pins → Output Signals
- Output IO corresponds with Mach3 #Output x
- Suggest Active Low = √
(Set low signal level for outputs)
2.6 MACH3 Spindle Speed Settings
MACH3 motion control card supports the following spindle speed control:
- PWM
- Pulse + Direction
- Analog voltage 0–10V
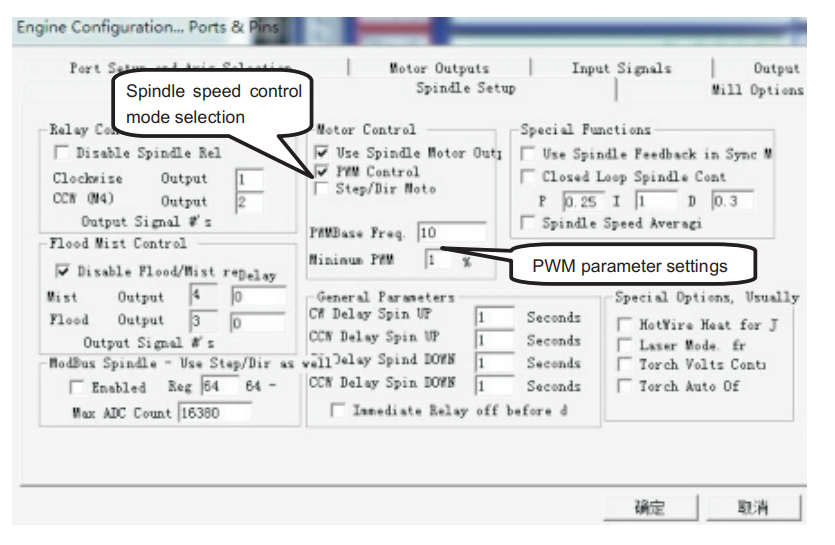
Path:Config → Ports and Pins
Spindle speed control mode selection
PWM parameter settings
Parameters Setting
- If using PWM or 0–10V analog voltage, select PWM control
- If using stepper + direction, select Step/Direction motors
Then set maximum spindle speed in:
Config → Spindle Pulleys
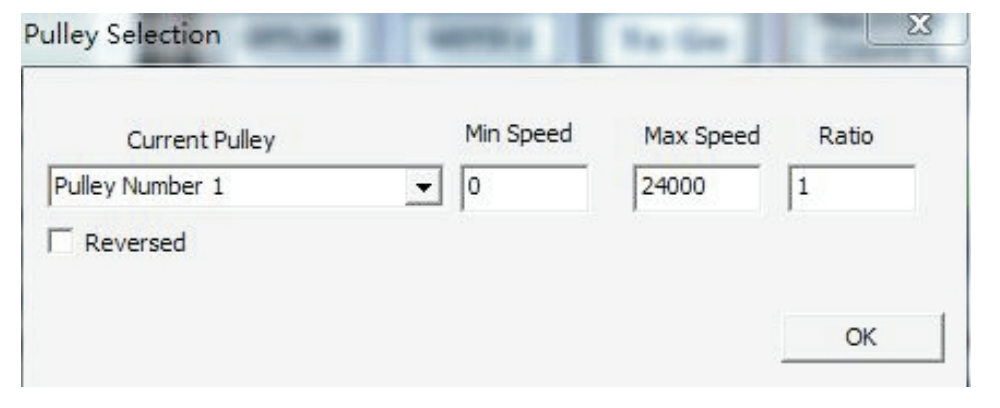
The Max Speed should be adapted to your spindle.
2.7 USB Motion Control Card Configuration
NcUsbPod plugin displays:
- Motion control card status
- Input and output IO status
- Configuration parameters
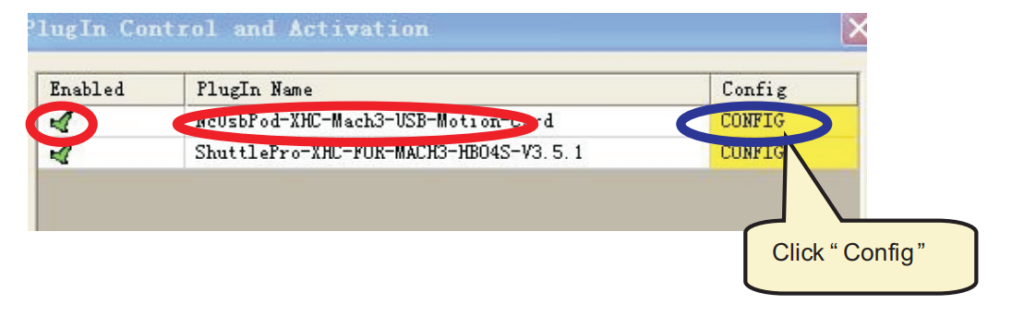
Path:Config → Config Plugins → PlugIn Control and Activation
Click Config
Configuration Window Description
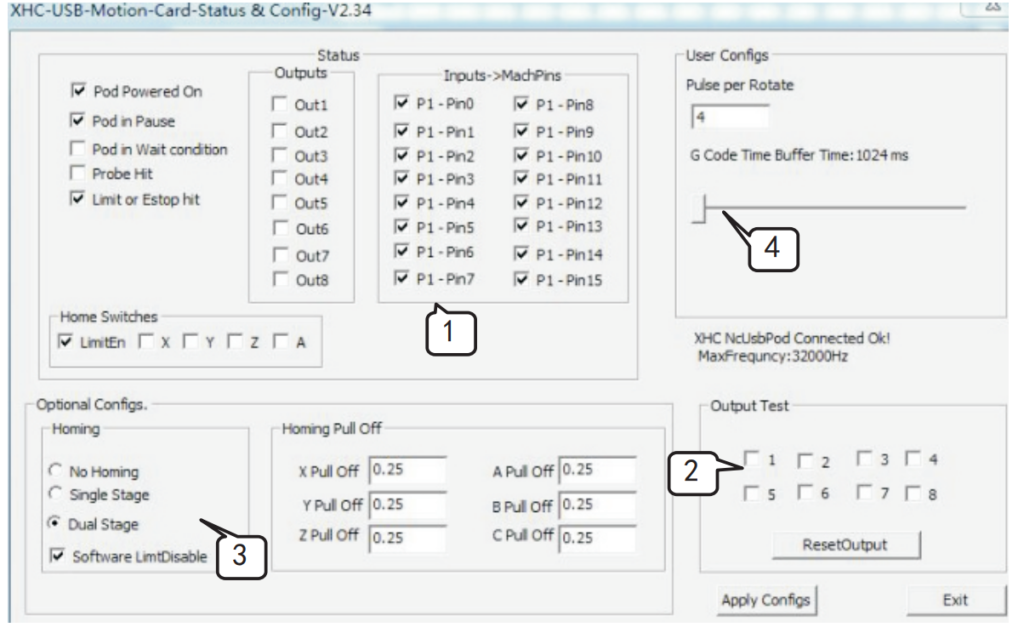
- Input and Output Status
You can see input IO changes when activated or deactivated. - Output Test
You can set Output IO from 1–8 to high or low (√) when clicking ResetOutput. - Homing Status
Display whether axis home switch is active.
Homing mode selection:
- NO HOMING: no homing, just clear machine coordinate
- SINGLE STAGE: home over when touching home switch
- DUAL STAGE: home continues when touching switch and moves back to fixed position
- G-code Buffer Time Settings
Set according to PC performance. Usually do not change.
三、Trouble Shooting
3.1 Rectangle Work Becomes Round
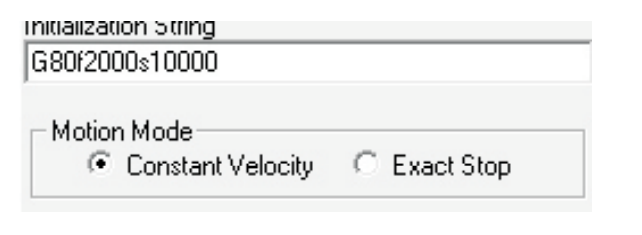
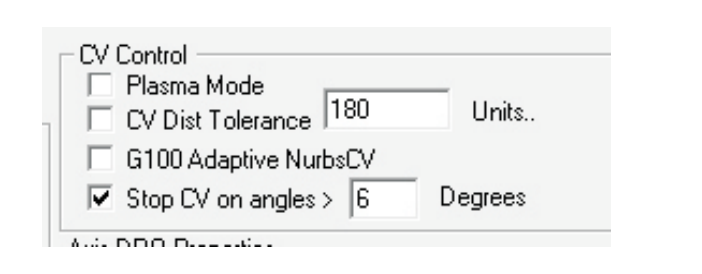
Path:Config → General Config
- Enable Constant Velocity
- Choose Stop CV on angle > 6 degrees
3.2 Mach3 Cannot Find USB Motion Card
Prompt:
Is the Xpod Inserted ok? it has ceased to respond…
Check:
- Make sure USB motion card is inserted correctly
- If spindle is on, make sure VFD is grounded
- Make sure VFD input power has electrical filter to isolate noise
3.3 How to Ref All Home
- Enable home IO
Path:Config → Ports and Pins → Input Signals- Enable Xhome, Yhome, Zhome
- Port# = 1
- Pin number = 0, 1, 2
- Active Low = √
- Open plugin
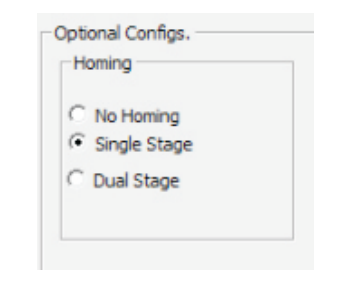
Path:Config → Config Plugins → NcUsbPod → ConfigChoose Single Stage / Dual Stage - Make sure home switch signal is OK
- Click Mach3 button Ref All Home
- If homing direction is reverse:
Config → Homing / Limits → Home Neg Reverse
3.4 Mach3 Auto Exit When Plugging USB Card
- Remove other USB devices (such as USB keyboard)
- Insert USB motion card again
Mach3 Indication
- Is the Xpod Inserted ok? it has ceased to respond…
USB motion card is lost - XHC ncusbpod connected
USB motion card is connected correctly - Probe ignore, active at call for probe
Probe signal is active - Too fast for pulley using max
Spindle speed exceeds maximum speed - K word given for arc in xy plane block…
Mach3 does not support the file
In Mach3-based CNC systems, selecting a stable and compatible motion control card is critical for accurate motion control and reliable machine operation. This tutorial uses the DAPPRA KA05 Mach3 USB Motion Control Card as an example. All wiring, software configuration, and Mach3 parameter settings described below are based on this controller.
If you would like to view detailed product information and specifications, please visit the DAPPRA KA05 Mach3 USB Motion Control Card product page .
Product Selection Table – Mach3 Motion Control Cards
Use the table below to quickly select the most suitable Mach3 motion control card based on axis count, communication interface, and MPG handwheel support.
| Model Category | Axis Support | Interface | Mach3 Support | MPG Handwheel | Typical Applications |
|---|---|---|---|---|---|
| Mach3 Control Card | 3 Axis | USB | ✔ All Versions | Wired / Wireless | Entry-level CNC routers, engraving machines |
| Mach3 Control Card | 4 Axis | USB | ✔ All Versions | Wired / Wireless | Standard CNC routers, rotary axis applications |
| Mach3 Control Card | 6 Axis | USB | ✔ All Versions | Wired / Wireless | Advanced CNC systems, multi-axis linkage |
| Mach3 Control Card | 3 Axis | Ethernet | ✔ All Versions | Wired / Wireless | Industrial CNC with higher stability requirements |
| Mach3 Control Card | 4 Axis | Ethernet | ✔ All Versions | Wired / Wireless | CNC machines with rotary axis and long cable runs |
| Mach3 Control Card | 6 Axis | Ethernet | ✔ All Versions | Wired / Wireless | Professional multi-axis CNC and automation systems |
How to Choose the Right Model
- Choose 3-axis if your machine is a standard CNC router or engraver
- Choose 4-axis if you need a rotary axis or more flexible machining
- Choose 6-axis for complex motion control or multi-axis linkage
- Choose USB for easy setup and general applications
- Choose Ethernet for better noise immunity and industrial environments
- Add MPG (wired or wireless) if precise manual jogging and setup are required
Product Links
For detailed specifications, pricing, and ordering information, please visit the product pages below:
3-Axis Mach3 USB Motion Control Card (KA03)
👉 View Product Details4-Axis Mach3 USB Motion Control Card (KA05)
Mach3 USB Wireless 4-Axis MPG Pendant Handwheel (KA02)
👉 View Product DetailsMach3 USB Wireless 6-Axis MPG Pendant Handwheel (KB05)
👉 View Product Details








Tambah komentar
Anda harus masuk untuk berkomentar.